When a laptop encounters water exposure, the risk of losing valuable documents, photos, and work projects rises dramatically. Grasping the science behind water damage and embracing the right tools can make the difference between permanent loss and successful file retrieval. This article dives into essential techniques and software solutions to guide you through recovering your crucial files.
Understanding Water Damage and Data Loss Risks
Water can wreak havoc on a laptop’s internal components, leading to corrosion, short circuits, and irreparable hardware failure. Recognizing the stages of damage helps you take informed actions:
- Initial Exposure: Moisture seeps into connectors and circuitry, creating conductive paths that can cause immediate shorts.
- Oxidation Process: Over hours or days, metal contacts begin to oxidize, increasing electrical resistance and leading to erratic behavior.
- Component Degradation: Long-term exposure may destroy delicate parts of the motherboard or storage interface, making data access more difficult.
At the heart of your laptop lies the hard drive or solid-state drive (SSD), which houses your files. Even if the drive appears functional post-drying, hidden damage might compromise the integrity of sectors or data structures. Understanding these risks is the first step toward an effective recovery strategy.
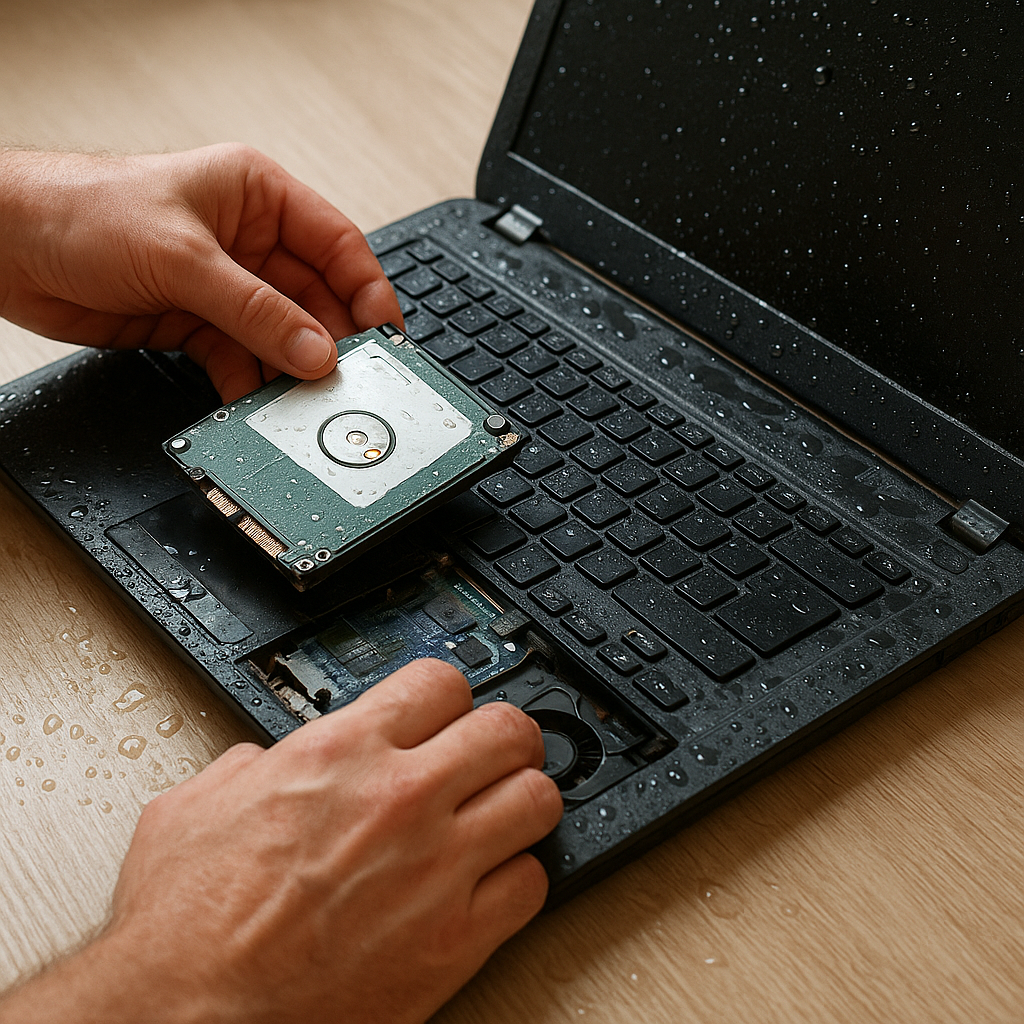
Immediate Steps to Minimize Further Damage
Time is critical when dealing with water-affected electronics. Follow these urgent actions to prevent additional harm and prepare for data retrieval:
- Power Down Immediately: Shut off the system to avoid electrical shorts. If the battery is removable, take it out carefully.
- Unplug All Accessories: Disconnect chargers, USB devices, memory cards, and any peripherals.
- Disassemble if Confident: Remove the back cover to access the drive. This step reduces the risk of moisture trapped in the drive bay.
- Use Absorbent Materials: Blot excess moisture with a lint-free cloth. Avoid rubbing to prevent damage to sensitive parts.
- Air Dry in a Low-Humidity Environment: Position the laptop or removed drive in a well-ventilated area; consider using silica gel packets or uncooked rice around the device to accelerate drying.
When to Seek Professional Help
If water damage involves salt water, coffee, or other corrosive liquids, or if the laptop was powered on during the spill, immediate professional assessment is recommended. These conditions can escalate damage severity beyond DIY mitigation.
Choosing the Right Recovery Software
Selecting an optimal tool is crucial for maximizing the chance of successful file restoration. Key factors to consider include file system compatibility, scanning methods, and ease of use.
- File System Support: Ensure the software can handle NTFS, FAT32, exFAT, HFS+, APFS, or ext4 depending on your drive’s format.
- Scan Modes: Look for both quick scan and deep scan options. A quick scan locates recently deleted files, while a deep scan reads raw data sectors for more thorough recovery.
- File Preview: Preview files such as documents, images, and videos before recovery, so you can prioritize the most important data.
- Recovery Destination: The tool should allow saving recovered files to an external drive or an external enclosure to avoid overwriting lost data.
- Customer Support and Updates: Choose software from a reputable vendor that offers regular updates and responsive support channels.
Popular recovery solutions include:
- Recuva – A user-friendly free option with solid basic features.
- EaseUS Data Recovery Wizard – Known for a clean interface and reliable performance.
- Disk Drill – Offers advanced scanning algorithms and disk health monitoring.
- R-Studio – Preferred by professionals for its raw data recovery capabilities.
- PhotoRec – A free, open-source utility that excels at recovering multimedia files.
Step-by-Step Guide to Recovering Files
Once you’ve selected your recovery software, follow this structured approach to retrieve files from a water-damaged laptop drive:
- Create a Disk Image: Before attempting recovery, generate a full byte-by-byte image of the drive. This precaution preserves the original data state and prevents further harm to the source.
- Connect the Drive Safely: Use a USB-to-SATA/IDE adapter or place the drive into an external enclosure. This setup isolates the drive from the damaged laptop and prevents accidental power cycling.
- Install and Launch the Software: Choose a clean, unaffected system to install the recovery tool. Launch the application with administrative privileges for full access.
- Perform a Quick Scan: Begin with the faster scan to capture recently deleted or minorly corrupted files. Review the file preview and mark critical files for recovery.
- Initiate a Deep Scan: If the quick scan misses important items, switch to the deep scan. This process can take hours, depending on drive capacity and condition.
- Select and Recover: Once scanning completes, filter results by file type, date, or name. Select your files and choose a recovery path on a separate drive to avoid overwriting.
- Verify File Integrity: After recovery, open various files to ensure readability. Corrupted entries may require repeated attempts or alternative software.
Common Pitfalls and How to Avoid Them
- Avoid installing recovery software on the damaged drive.
- Do not save recovered files to the same partition you are scanning.
- Keep the drive powered minimally and maintain a stable temperature to reduce further deterioration.
Advanced Techniques and Alternatives
If standard software cannot salvage your data, consider these advanced strategies:
- Command-Line Tools: Utilities like TestDisk or ddrescue can offer granular control over the recovery process. They allow manual sector mapping and customized read retries.
- Data Recovery Laboratories: For drives suffering mechanical failures or severe corrosion, professional cleanroom services may be required. Technicians can replace damaged heads or recover platters.
- File Carving: Specialized software can reconstruct files by identifying file signatures in raw data. This method is effective when directory structures are destroyed.
- Regular Backup Practices: As a precaution, establish an automated backup routine using cloud services or network-attached storage (NAS). This ensures you always have an off-site copy well before any accident occurs.
Preparing for Future Emergencies
Prevention is the best remedy. Maintain updated backups, store critical data on redundant media, and protect your laptop with waterproof cases or keyboard covers when working near liquids.
Ensuring Long-Term Data Safety
Even after a successful recovery, you can enhance resilience against future disasters:
- Implement a 3-2-1 backup rule: three copies of your data, on two different media, with one copy off-site.
- Monitor drive health regularly using SMART diagnostics and health-check utilities.
- Encrypt sensitive files so that even backup media remain secure if lost or stolen.
- Document your recovery process and maintain a checklist to streamline future interventions.
By combining immediate damage control, the right software tools, and robust backup strategies, you can navigate the challenge of water damage and emerge with your files—and peace of mind—intact.


